Sunday, 24 January 2016
QTP - 39 - Automatic Parameterization (From Version 11.0)
Automatic parameterization is a smart feature of QTP, which when enabled can create parameterization at the time of recording and corresponding column is generated in data table. While this option is selected, QTP replaces the constant values of your steps with action parameters and generates a column in data-table corresponding to it. This enables us to create actions that can be used for a variety of different purposes or scenarios by referencing different sets of data.When you stop a recording session while this option is selected, QuickTest replaces the constant values in the test object operation arguments of your steps with either Data Table parameters or action parameters, based on your selection in the Options dialog box.
Steps to activate this option :
From Tools -> Options under General tab, we have a new option "Automatically parameterize steps using" (shown as below), click the check box.

Steps to activate this option :
From Tools -> Options under General tab, we have a new option "Automatically parameterize steps using" (shown as below), click the check box.
An example showing the steps generated with the auto-parameterize enabled and disabled.
Option disabled (Data is hard coded)
Browser("Google").Page("Google").WebEdit("q").Set "hello world"
Option enabled(Data is parameterized automatically)
Browser("Google").Page("Google").WebEdit("q").Set Parameter("q_Text") 'q_Text defaults to "hello world"
QTP - 38 - Visual Relation Identifier in QTP !
As the name says, Visual relation identifier is a method to identify the object based on the neighbour objects. It works on the properties of the objects which are near to them. This feature is found very useful in few of the cases. If we take the example of webTable class in web based applications , it comes out to be the best feature. We can define the visual relationship identifiers, which can be set in both local and shared object repositories.
We can use VRI in both the ways that is descriptive programming and through configuring QTP manually.
->Through Descriptive Programming :
-> Through configuring in QTP manually :


Hortizontal – Enables you to tell QTP to id objects according to their hortizontal location in relation to the field to be indentified. You’ll have two options (Left and Right)
and an In line (horizontal) checkbox option.
Vertical – Enables QTP to find related objects based on their vertical location relative to the object you want to identify. It also has two options (Above and Below) and a In Line (vertical) checkbox option.
Distance and Hierarchy – Enables QTP to find related objects based on their distance to the location of the object you want to identify. It has four options: Closest on the X-axis, Closest o n the Y-axis, Closest on both axes and Contains.
Some Important points to remember about visual relation identifier are:
1. Visual relation identifier are taken into consideration if object is not uniquely identified using the object identification Properties(SI ,Ordinal Identifier ,etc).
2. Visual relation identifier have preference on smart identification for object recognition.
3. Ordinal Identifiers are ignored if visual relation identifier is defined for an object.
4. Visual Relation identifier are created for an object based on relative position of other stable object, i.e. objects existing left, right, top , bottom relative to object to be identified can be used for relative identifier.
5. Relative Objects should exist in object repository before a relation can be created if we are not using DP.
6. This is used to filter in case of multiple objects in the application matching object definition but are placed relative to other object in application.
7. If no objects in the application match the test object’s description properties, then the visual relation identifier you defined is ignored.
8. Visual relation identifiers are not supported for WebService test objects.
We can use VRI in both the ways that is descriptive programming and through configuring QTP manually.
->Through Descriptive Programming :
Set rc = VisualRelations.Create
Set relation = rc.Add
relation.relatedobjectpath = "Browser(""micclass:=Browser"").Page(""micclass:=Page"").WebElement(""innertext:=Art"",""html tag:=LABEL"",""index:=0"")"
relation.relativeposition = micRelRight
relation.setargument micrelinline, True

Set des=Description.Create
des.Add "micclass","WebCheckBox"
des.Add "visual relations",rc

Browser("micclass:=Browser").Page("micclass:=Page").WebCheckbox(des).highlight
Set relation = Nothing
Set rc=Nothing
-> Through configuring in QTP manually :
In the QTP object repository click to on the visual identifier setting’s click to add
On the Visual Relation Identifier screen click on the + plus sign under the preview button:
Point to the object you want to use to help QTP identify the field you need to recognize
Point to that object in relation to which you want to define a object through VRI.
Three Visual Relation Identifier detail options:
When you bring up the Visual Relation Identifier you’ll have three main categories (under Relation Details) to choose from: Horizontal, Vertical and Distance and Hierarchy.Hortizontal – Enables you to tell QTP to id objects according to their hortizontal location in relation to the field to be indentified. You’ll have two options (Left and Right)
and an In line (horizontal) checkbox option.
Vertical – Enables QTP to find related objects based on their vertical location relative to the object you want to identify. It also has two options (Above and Below) and a In Line (vertical) checkbox option.
Distance and Hierarchy – Enables QTP to find related objects based on their distance to the location of the object you want to identify. It has four options: Closest on the X-axis, Closest o n the Y-axis, Closest on both axes and Contains.
Some Important points to remember about visual relation identifier are:
1. Visual relation identifier are taken into consideration if object is not uniquely identified using the object identification Properties(SI ,Ordinal Identifier ,etc).
2. Visual relation identifier have preference on smart identification for object recognition.
3. Ordinal Identifiers are ignored if visual relation identifier is defined for an object.
4. Visual Relation identifier are created for an object based on relative position of other stable object, i.e. objects existing left, right, top , bottom relative to object to be identified can be used for relative identifier.
5. Relative Objects should exist in object repository before a relation can be created if we are not using DP.
6. This is used to filter in case of multiple objects in the application matching object definition but are placed relative to other object in application.
7. If no objects in the application match the test object’s description properties, then the visual relation identifier you defined is ignored.
8. Visual relation identifiers are not supported for WebService test objects.
QTP - 37 - Shortcuts of QTP !
New Test : Ctrl + N
New Business Component : Ctrl + Shift + N
Function Library : Alt + Shift + N
Application area : Ctrl + Alt + N
Open Test : Ctrl + O
Open Business Component : Ctrl + Shift + O
Open Function Library : Alt + Shift + O
Open Application area : Ctrl + Alt + O
Add new Test : Ctrl + Shift + T
Add new Business Component : Ctrl + Shift + B
Add new Application area : Ctrl + Shift + A
Add Existing Test : Ctrl + Alt + T
Add Existing Business Component : Ctrl + Alt + B
Add Existing Application area : Ctrl + Alt + A
Close: Ctrl + F4
Close Solution : Ctrl + Shift + F4
Save Test : Ctrl + S
Save All : Ctrl + Shift + S
Undo Changes : Ctrl + Z
Redo Changes : Ctrl + Y
Cut : Ctrl + x
Copy : Ctrl + C
Paste : Ctrl + V
Comment : Ctrl + M
Uncomment : Ctrl + Shift + M
Indent : Tab
Outdent : Shift + tab
Complete word : Ctrl + Space
Argument Info : Ctrl + Shift + Space
Apply “With” to the script : Ctrl + W
Remove “With” : Ctrl + Shift + W
View Solution Explorer : Ctrl + Alt + L
View Toolbox : Ctrl + Alt + X
View Properties : Ctrl + Alt + P
View Data : Ctrl + Alt + D
View Output : Ctrl + Alt + U
View Errors : Ctrl + Alt + E
View Tasks : Ctrl + Alt + K
Find : Ctrl + F
Find Next : F6
Replace : Ctrl + H
Incremental Search : Ctrl + E
Reverse Incremental Search : Ctrl + Shift + E
Toggle Bookmarks : Ctrl + B
Goto Matching Brace : Ctrl + M
Goto Location : Ctrl + G
Step Generator : F7
Check Syntax : Ctrl + F7
Record : F3
Stop Run/Recording : F4
Analog Recording : Ctrl + F3
Low Level Recording : Shift + F3
Most frequently used
Run : F5
Run now : Shift + F5
Stop : F4
Run from step : Ctrl + F5
Step Into : F11
Step Over : F10
Step Out : Shift + F10
Insert Breakpoint : F9
Remove Breakpoint : Ctrl + F9
Clear All Breakpoints : Shift + Ctrl + F9
Open Object Repository : Ctrl + R
ALM Connection : Ctrl + Q
Next Window : Ctrl + Tab
Previous Window : Ctrl + Shift + Tab
Help : F1
QTP - 36 - Version control with QTP !
Version control is used to trace, manage and control the history of each software change. It includes all the changes like what was done, who did it and also the reasons. It lets you to track the changes in the scripts over a period of time. We can also look back and see that what changes were done at a particular period of time and who did it. We can also revert our scripts to the older versions if needed. It allows three main things in the software that is reversibility , concurrency and annotation. So lets talk about version control in QTP.
Reversibility - the ability to back up to a saved, known-good state when you discover that some modification you did was a mistake or a bad idea
Concurrency- the ability to have many people modifying the same collection of code or documents knowing that conflicting modifications can be detected and resolved.
Annotation means attaching explanatory comments about the intention behind each change to it and a record of who was responsible for each change.
For version control with QTP we need to have licenced tool QC or ALM. We need to integrate the ALM with the QTP. Once the version control is configured then all your ALM assets (including resources) cannot be modified anymore without checking them out. Each time we need to check out and make our changes and check back in to view our changes.
QTP recognizes the version control being enabled, and behaves accordingly (requires (and supports) checkout before modify, and so on).
Note : Always the latest version of Asset is checked out to a user
Thursday, 21 January 2016
QTP - 35 - Record and playback
QTP/UFT also provides the option of recording the tests and re-play it. We have an option of record on the toolbar menu , we can select the modes of recording and record the steps. We can also apply checkpoints in record mode. Mouse and keyboard movements can also be captured in record playback mode.
Although record-playback functionality is not used much but we have its advantages too. Lets discuss about each of the advantages and disadvantages :
Advantages :
It can be used for an application for which maintenance is not required.
It can be used for recording both mouse movementa and keyboard inputs.
It is considered easy for beginners because it takes less time and knowledge to get started.
Faster test development (though eventually maintenance and debugging time would over-weigh this advantage)
POC can be easily created for a quick demo.
Disadvantages :
Its very Fragile, a simple change may lead to lot of changes.
We can't apply any validations while recording.
It may record un-necessary steps depending upon the level of recording present in tool.
The test data is hard coded in scripts.
Tough to maintain the codes for any changes in the software.
Tuesday, 19 January 2016
QTP - 34 - Significance of each type of action call
We can create/call an action directly from an existing action by right clicking in the script area :
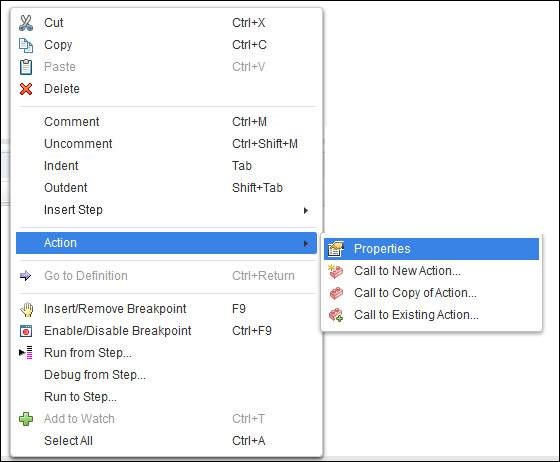
So basically we can see here that there are three options to call an action. Lets see significance of each one of them :
1) Call to a New action - This option is used to insert a new action from the existing action.
2) Call to Copy of an Action - This option inserts a copy of the existing action.
As the name says this option directly copies all the attributes of the action which we are calling. It copies checkpoints, repositories, data tables and action tab in data table. Since this is the copy of the source action so it is always editable and any changes made will be local only. The source action remains unaffected. We can use this functionality with both the reusable and non-reusable actions. Target can be changed without modifying the source.
3) Insert call to Existing action - Inserts a call to existing reusable action.
This is different from the above type of the action. Only the reusable action can be called using this action. All the attributes like checkpoints, repositories,etc are in read-only mode and are non editable. The action can be modified in the that test only in which it was created. Once the source action is changes all the targets will be changed.
Note : If we have to use an action with modification then we can go for " Call to copy of an action" and if modification is not required then we can go for "Call to Existing Action".
Subscribe to:
Comments (Atom)